Create sln file with multiple projects in .net core cli.

In this article we will learn how to create a .net core project with a Solution (sln file) that contains multiple projects. I know most you guys use visual studio for c# related stuff, but it would be benificial for person who likes to switch with vs code ocassionally, like me or who use linux and forced to use .net cli. Although if you are a new developer and have windows operating system, I will recommend visual studio, because it is the best possible IDE for c# development.
Our project structure will be like this.

Book-Store-Spa-Backend is our root folder, inside it we have a sln file and 3 different projects.
(i) BookStore.Api (UI layer)
(ii) BookStore.Data (Data layer)
(iii) BookStore.Test (Unit Testing project)
Create a sln file named inside a folder Book-Store-Spa-Backend, it is also our solution name.
dotnet new sln -o Book-Store-Spa-BackendThis command will create a folder name ‘Book-Store-Spa-Backend’, inside that folder it will create a sln file with same name. We need to create more project , in order to achieve that we need to move into ‘Book-Store-Spa-Backend’, so in your terminal write this command.
cd Book-store-spa-backendNow we are inside “Book-store-spa-backend” directory.
Create new a web api project. It will be our UI layer.
dotnet new webapi -o BookStore.ApiLet’s create another project (class library), it will be our DataAccess layer, where we will write our database logic.
dotnet new classlib -o BookStore.DataLet’s create another project (xunit project for unit testing).
dotnet new xunit -o BookStore.TestNow we need to create a add these 3 projects in our solution. Write the following command.
dotnet sln Book-Store-Spa-Backend.sln add .\BookStore.Api\ .\BookStore.Data\ .\BookStore.Test\ add .\BookStore.Api\ .\BookStore.Data\ .\BookStore.Test\I know you are thinking 😖how to remember these file names .

Lets make it simple just type dotnet sln Book-Store-Spa-Backend.sln after that press tab button, it will autocomplete the name of project, if it is not the right one then press it again, until you find the right one. and its done.

Type “ cd.. “ in terminal. Because we need to exit from this directory,
cd..Now following command will open our project in vs code.
code Book-Store-Spa-Backend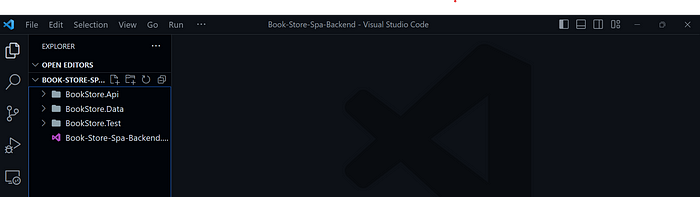
Let’s make it feel more like visual studio, this step is completely optional. Install the following vs code extension.

Now you can find the visual studio icon in side navbar of vs code, click on that icon and now you can get little feel of visual studio’s solution explorer.

Last thing we need to do here, we need to add reference of BookStore.Data to BookStore.Api project.
dotnet add .\BookStore.Api\BookStore.Api.csproj
reference
.\BookStore.Data\BookStore.Data.csprojMvcBlogDemoData\MvcBlogDemoData.csproj
And add reference of BookStore.Data and BookStore.Api to BookStore.Test
dotnet add .\BookStore.Test\BookStore.Test.csproj reference .\BookStore.Data\BookStore.Data.csproj
dotnet add .\BookStore.Test\BookStore.Test.csproj reference .\BookStore.API\BookStore.Api.csproj
I hope you have enjoyed the article, if you find this article don’t forget to make a clap, and share it any social media platform like twitter, so that creator like us get encouraged.
Connect with me
👉 YouTube: https://youtube.com/@ravindradevrani
👉 Twitter: https://twitter.com/ravi_devrani
👉 GitHub: https://github.com/rd003
Become a supporter ❣️:
You can buy me a coffee 🍵 : https://www.buymeacoffee.com/ravindradevrani
Thanks a lot 🙂🙂
